Translate

Showing posts with label WIP. Show all posts

Friday, June 9, 2023

Landscaped in June

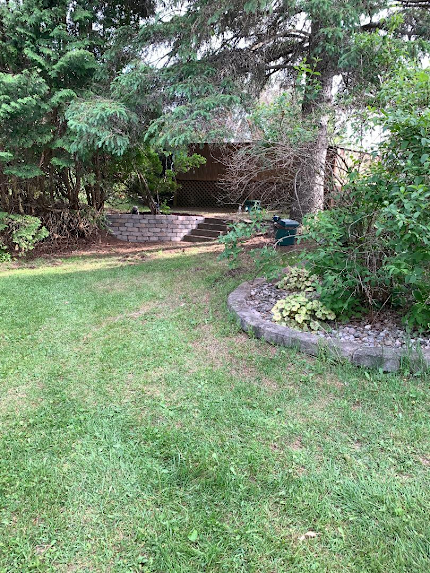
Those two pallets of landscape blocks - GONE!  or maybe I should say used for their intended purpose.  I purchased 3 pallets of blocks years ago to separate the plantings, shrubs from the lawn.  Hired Jason D. to place them and then winter blew in   That was years ago.   The surround was almost done there again, two spots were left unfinished.  That seems to be the recurring theme around here.  Anyways, his employee Cal W. did the most of the work.  

So I contacted JD in April to see if he would be able to finish the job and found out he's now in Maryland so gave me Cal's number.  Contacting Cal, I learned of his upcoming kidney surgery 5/1/2023 so he gave my name and number to another man (JL) who did this type of work.  The month of May came and went.  Nothing.  So I re-contacted CW via instagram to see how he was post surgery.  We talked, he had wondered... as he didn't see any progress and I found out that JL had moved to Tennessee, so bada-bing, bada-boom - we scheduled 6/4 on our calendars to get it done.  Gorgeous day and success!   

It now looks like this:


I also worked on my outdoor lighting which I'm thrilled with.  
They are all solar lights and differently styled so it doesn't look like a airfield landing strip surrounding the house.  lol        Perhaps tonight I'll go out and grab some evening shots to share later.  

The retaining wall on the left side of the house, I did many years ago and it took me three times to stack those field stones so they looked level.  I was satisfied then with my efforts and gratefully  they served their purpose for decades, however just one of my idiosyncrasies is I don't like patch jobs (except for  quilts that is) on roofs, additions, landscaping materials.  I'm an all or nothing kind of girl.  So I wanted the materials to be cohesive.  Thereby my desire of changing the retaining wall to the same landscape blocks.  


A couple of photos of before and during...


The dump cart's tire blew so there is another flat tire I'll need to contend with.  That seems to be another ongoing problem around here and for so many years as well!  :-0! 
 Oh well, that will be for another day.

Am happy at my progress. 
Was really tired too but that day's stats on my fit  bit were:  
7.82 mi; 17896 steps; and 157 minutes cardio 
another win!

TTFN, Jane


Friday, February 10, 2023

Cloth Spool Progress.

 Slowly am getting my mojo back.  Very Content… Progress. 

 The last of the necessary Spool blocks were completed this week.  


All 100 block units are done with 16 pieces each.  Next up, trim units if needed and then preview layout colors. 

Am hoping this center will be completed in February.  My Mom has been in Hospice Care now for 9 + weeks.   Bittersweet times and her Love, dignity, strength and resolve continue to be amazing. 


Sunday, October 10, 2021

Another WIP be Gone for 2021 - STAR SPANGLED BIRTHDAY and a giveaway

Star Spangled Birthday
stitched area is 8" x 4" 

Toot toot!  

                            Whoop whoop another finish that is totally done.  

The design is Star Spangled Birthday by From Nancy's Needle and I loved it the first time I saw it.  The stats are being listed for my own reference only and changes I personalized being asterisked for easy notation.  It was basically stitched as designed with the called for threads on 18 count sandstone zweigart mono canvas.


The Watercolors by Caron numbers threads used are:   008 Nerfertiti, 016 Bark, 138 Winter Wheat, 160 Night Sky, 165 Granite, 255 Cornflower Blue,  and 257 Spearmint.  

DMC#5 weight colors were: Ecru, 498 Dark Red Border*, 321 Flag and Bunting*, 823 Navy - Bunting*.  

The Kreinik #12 weight Tapestry Braids used are: TR279 - Dark Multi darker windows on Left home *, 3202 Cats Eye for the Lighted windows.  

Gold Rush #18 used were *GD109C darker windows on Right Home*, GD45C Red, GD136C Navy and then added extra sparkle in the self designed fireworks using an assortment of sparkly threads like, *razzle dazzle Orange, an unknown *Green Sparkle I got through a thrifted mermaid item while visiting Mom in Florida, also unknown maker of two colors of a *Hot Pink Sparkle and an *Aqua sparkle. 


Many fibers were used and am glad I changed it up along the way.   The border colors only used the Rainbow gallery sparkly Blue in it and then I changed the called for Nefertiti red toned to a deeper toned DMC instead with out the sparkle*.  The *patriotic items were brightened up with a truer red as well as the windowed glass bits*.   Also made were changes to the design of the street lamps with a more to my liking simplified lamps and attempted successfully I think, a "truer to my memory" images of actual fireworks going off then the illustrated patterned lightning strike effect printed and designed.    Am so glad as I progress with my hobbies that I'm at liberty (yep- pun intended!) to change and stitch projects my way.  

Also was able to bring it to Aaron Brothers (Michaels) with 2 coupons, a 60% off and with an additional 25% off to get it framed with  the 2  mats and the selected frame which complements it perfectly.  That white pickled finish on the frame has hints of gold brushed through it letting it highlight the light affect of all those threads.  SO in honor of this finish... I did mention a giveaway:

To share in my self-finishing glory and joy,  I'm hosting a giveaway of this gently used chart to the continental US only.  My regrets to my other followers though for this exception but due to expense of international mailings it's unfortunate but too costly.  The winner will be drawn and announced here in November and I'll try contact you if I'm able to.  I plan to mail this out on my Birthday, November 10 to celebrate.   To enter, leave a comment on this post and share what you are most thankful for.  That's it.  Good Luck!

It was a fun stitch and only took me about 3 months to do and that's with sending it out to be framed too,  LOL.   But I work at a snails pace sometimes.  

  
TTFN,
Jane

Giveaway closed,   Sorry there were no entrants, so I will be letting this go in another manner.

Happy Thanksgiving.


Thursday, November 1, 2018

Hope your Halloween was Happy

October flew by with more happening in and around my home.  My husband continues to do well health-wise and the monthly Boston trips are becoming even more routine.  Typically I try to have a picnic or quick touristy stop nearby with the clinic visits, but didn't scope any out for October as we had so much already going on.

Our first focus for the month was repainting the outside panels of the above ground pool.  CHECK!
Years ago we used "water-filled" gallon jugs to hang off the winter cover (that's what we were told to do to keep that winter cover on).  It didn't work and those water filled jugs just rode up and down on the outside pool panel walls destroying the finish all winter long.  At that time, we used a recommended Epoxy paint to resurface the exterior pool panels.  Because we used a deeper grey tone then we noticed a 5 degree increase in water temperature.  It made make sense when you think about it as darker colors attract and keep more heat than the lighter reflective colors.  Fast forward 25 years later, that surface was getting sun fade and some smaller area blights. So with every thing else going on I thought it best to get it done this fall rather than trying to complete one more spring-time chore and who knows what we'll be dealing with health-wise at that time besides.  My philosophy of taking care of it now rather than later.   DH wasn't too keen on the idea but he slowly warmed up to it after I moved many stones to let the lower part be exposed.  Walls were washed and primed, taped off then painted with an Oil based paint.  The medium darker grey color wasn't available or offered so I thought, okay....we'll use the lighter grey and mix 2 parts of it with one part of black.  It worked and it's a very dark grey -almost too dark but now it's DONE!  Even the landscaping of returning the rocks back to the bottom edging.  Looks good and feels great.  We only have to trim paint the top rail after opening the pool next year.  We also had to replace the pool liner this year as the other one which started leaking dh destroyed it by poking holes allover it so it could drain through the winter which shredded it to pieces.....  long story, but thankfully it's over now.

On a personal focus I had planned to finish the Autumn Medley this past month, a needlepoint kit I started last year while Hurricane Irma was attacking my Mom's neighborhood in The Villages.  And sweet success, I just  finished the last stitches on it this past week.

Autumn Medley designed by From Nancy's Needle on 18 Zeigart Sandstone Mono Canvas
with the called for threads.  Caron Collection Snow- 14 -Mango, Caron Collection Watercolours #137-Copper and #255 Cornflower blue, DMC#5 #435 Very Light Brown, 437 Light Tan, 935 Dark Avocado Green and 3371 Black Brown, Rainbow Gallery Gold Rush 18 GD109C Bronze and Rainbow Gallery Overture V122-Caravan
Since attending my quilt guild in Glens Falls by myself, (I usually travel there with a friend or two) it was a great time for me to travel to KC Frames and Fabrics in Saratoga Springs to check out the framing that she could do on it even though it wasn't completely stitched at that time, I still had the two smallest leaf design elements to finish. They're both in the center areas of the top and bottom.    KC's offered an idea of one mat/frame available that I don't mind but I'm not sure if I'm in love with it after all my work if you know what I mean.

With using a mat, I noticed that just at the edge you could see the mono canvas slightly behind the last row of stitching just beneath the mat edge.  So I used a black magic marker to color three rows of the  mono canvas borders not yet stitched and then decided to stitch one more row of stitches in the same border thread used (Bronze Rainbow gallery GD109C) around the perimeter to counterbalance any loss of design by the matting and framing.

We'll see and I need to stop by some more framing shops before I "pull the trigger" on what I select.

Step one of Secret Santa sew along
The last week end was an annual quilt retreat I love doing with my friend Trudy.  It's become a pilgrimage and I thoroughly enjoyed every bit of it despite the weather happening along the St. Lawrence seaway.  Thankfully was able to get to the many bits I brought along to get done.  What's that you say..., well I was able to cut out the Prima Diva Clutch with all of it's parts of cloth, fusible batting and interfacings, also got part one all cut out for Temecula's Quilt Secret Santa Sewalong  and all those nine patch blocks are sewn now ( the only change made was using a black Grunge for my center square instead of browns), Step two soon.  Then was able to progress on preparing Homestead Hearth's BOM for my "go to bag".   I only have 3 more blocks to prepare and the border pieces - boy I'm  always amazed at how much time this takes!

I also took two different classes besides all the projects I brought for prep work.   One of a folded star taught by Debbie Baldwin and the other a wool project with Phyllis Acres so I felt really accomplished in getting to all I did besides the talking and reconnecting with friends.  The latter is now a current WIP now being focused on.  lol


While I was doing that dh got to enjoy some quality time with the grands.


Signing off but not before I share a pic of the grand dog with his Halloween costume.


TTFN
Jane


Friday, March 8, 2013

Backing made for lone star - CHECK!!!

Have to admit sometimes I am sneaky!    One of the focuses I listed in my pledge of four was to make the backing for my lone star quilt. 

 
CHECK!!

Hancocks of Paducah is having a sale on their wide backing fabrics so I just "uh hummmm... - MADE the backing" cough, cough,  sputter choke!  and am so plezzed with myself.  lol


This is what I ordered:   http://www.hancocks-paducah.com/Item--i-WP-7210-101 .
After placing the order, I noticed it's on back order so I wonder how long it will take.   

Initially for me this LONE STAR  quilt called to have more developed borders than it actually has. 

 
My dilema was that I ran out of fabric to do this. 

 
I needed more of that print on the left.  So after more than a decade and a half later, and after several failed attempts at acquiring the needed yardage, I literally  threw on  3 straight borders with the fabric I had on hand to get the size wanted.  Figuring it's a 15 year old WIP that needed to be finished.

When I got to this point, I wasn't happy.
 
This quilt was not what it needed to be.


So it languished  as a PIT (Project in Tote) and I stewed on and off for another year.  Last month I figured ENOUGH!!
I'll list it on the get er done list to get the back made and just proceed with it.

but , I still am not happy about it. 


It and I truly wanted it to become this:


See that second lighter border.   I drafted 60 degree diamonds into a 45 degree orientationand paper pieced the two corners successfully.  Here;s a leftover pattern since I only needed two. 
 
The seminole piecing  the 60 degree chains into strips for the two opposing corners have been done and  sitting very nicely in the Tote too.
 
I wish these could have been used in the 2nd border as planned.....


NO! I won't be ripping out any borders.
When I listed in the get er done for March I had initially figured on sending it to a longarmer and just get it quilted.
 
 
Playing with the quilt designs.....


Then while planning how this would be quilted I had an ah.. ha.... moment.
 
Perhaps I could quilt this originally concepted design into the borders and do a touch of trapunto for that pommegranite vine into the opposing corners. 
 
YES!!!!  That's it. 
 
With this being about 102" x 102" big, I know this will be a huge undertaking on my DSM. 
Though I am not a proficient quilter by any means, I have improved my quilting skills as I progress in this hobby.
Each quilt, bag, table runner and project made I see an improvement in the finished results.   I won't expect perfection in the quilting but will have fun as it proceeds.
 
The first step needed will be to design the trapunto vine design and stitch the batting to the backside of the topwith some wash away thread.  I can do this while I wait for that backing order and it will tell me if I am totally barking up the wrong tree with my little abilities. 

Wish me luck! 
 
 
Perhaps I should just start playing in the pillow I painted that will compliment the lone star quilt?  Here's a peak:                                                                                                                      
Click on the blurry picture of it and you can see the year, 1998 when this was stenciled and painted!  See 15 years at least!


Enjoy your day
I'm off to play,
Jane


Tuesday, October 23, 2012

Mistake found

While working on the last several sections for my PGD#1's  bed quilt I found an error within the pattern directions for the Big EZ.

 
So I circled the errata in the book for future reference even though truth be told,
I did have those parts already assembled and ready to be sewn on. 
Thank goodness I had a coherent brain process and said ?WHAT?  and stopped to try to figure it out.
It's in Vicki Bellino's book, Bloom Creek.  Other than that, the directions have been very smooth and easy to follow.


Any day now..... 
 
 
Jane
 

Friday, October 19, 2012

Ball Patchability Finished


A small finish of mine recently was another patch-a-bility.    I started this by getting the fabrics ready and wasn't thrilled that  all of the flowers were yellow.  So I dug into some scraps and found a substitute for the coneflowers, a nice medium purple.  Much better to my eye.
 
I dug the discarded jar out of the trash bin so you'd see the difference. 
Trying to quickly get this done I tried to do a free hand machine embroidery for the BALL on the jar and this is what it looked like.  YUCK!   Quickly realizing and discarding it to get the hand work done and have a better work of it  if I do say so myself.

Close up showing difference.


On other patchabilities I machine quilted the backgroundbut for this one with so many stems going through it and all the starts and stops that would have to be made I proclaimed this good enough as is and decided sans quilting except for the same framing quilt line in the border.  Any of these  pics are clickable for a closer look if wanted.


Now the next WIP on the horizon will be containing these prints and is going along smoothly so far.
I wanted to thank all my followers and blogging buddies for their kind regards and comments in my posts.  I do enjoy them and try to respond to each of them and recently I have been having too many anonymous comments so apologize if one of yours was mistakenly deleted.   


Jane